Setup and first use of Pi1541
- gozdnijezek
- Jan 17, 2021
- 4 min read
Updated: Jan 18, 2024
Pi1541 is a Raspberry Pi hat created by Steve White(his page), that simulates C64 5 /4 floppy drive. Allowing you to load programs/games from an SD card to your Commodore 64/128 machine.
What you need

You will need a Raspberry pi, Pi1541 hat, pi power adapter, Serial Cable and a micro SD to make this work.When you get the Pi1541 hat and assemble everything, you need to setup the SD-card.
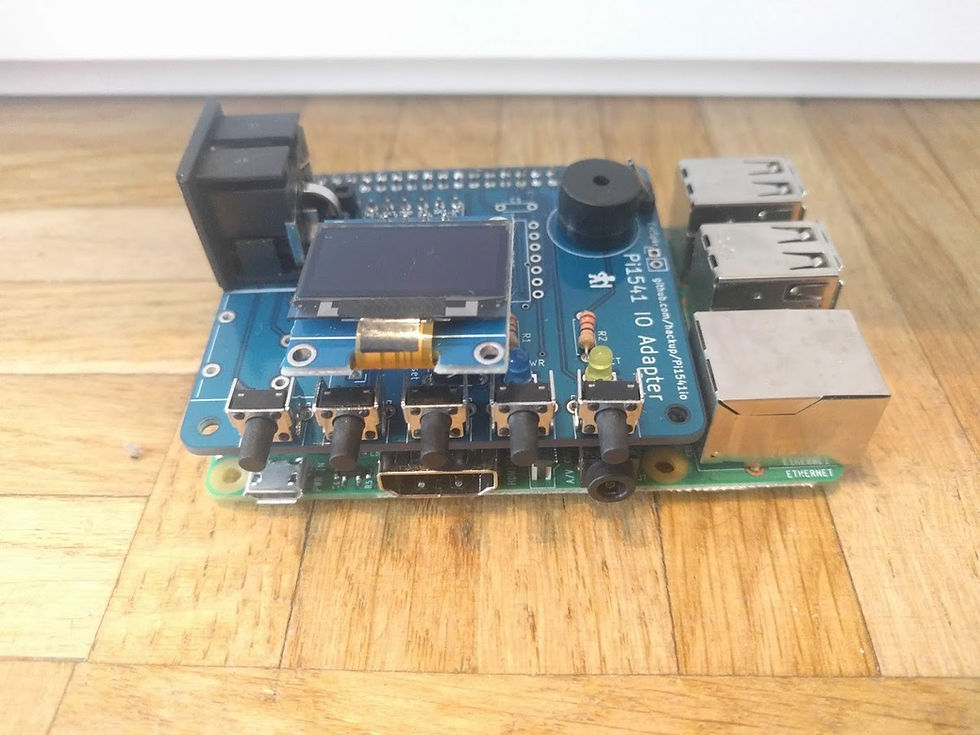
This is how it should look like after assembly.
SD card setup
Format an SD card to Fat32 this can be done in Windows (right click on drive and select format)
Download the Raspberry Pi Firrmware from the Raspberry Pi Foundation.
Once downloaded Unzip the archive.
Copy the 3 files (bootcode.bin, fixup.dat and start.elf (found in firmware-master\boot)) into the root folder of your SD card.

Unzip the supplied zip file (Pi1541.zip) (or get it from: https://cbm-pi1541.firebaseapp.com/) to the blank SD card. (This will create a folder called 1541 in the root folder of the SD card(*). This is where you can place your Commodore disk images and folders).
Copy over a file that contains a 1541 ROM image into the root folder of the SD card. ROM can be found here (I used 1541-II.251968–03.bin)(rename the file!) The ROM must be called dos1541 or d1541.rom or d1541II or Jiffy.bin.
(OPTIONAL) Copy over a file that contains a CBM font ROM into the root folder of the SD card. The ROM must be called chargen and can be found here.(I used characters.901225–01.bin ) (rename the file!) Copy your disk images(games, programs) and folders into the 1541 folder now found on the SD card.
If you have a handy OLED you’ll need to enable the screen in the configuration (options.txt). I had to uncomment:
LCDName = ssd1306_128x64But it depends on your hardware.
Setup and usage
Now that you have a working SD card it’s time to set up: Insert the micro SD to Raspberry Pi
Connect the Raspberry Pi with Pi1541 hat to your Commodore with Serial Cable and micro USB power supply
Power on the Raspberry Pi with Pi1541
Turn on the Commodore 64
Loading Files with FB64

Mounting and lunching FB64 Commands:
LOAD”$”,8 — — — — lists the drive content
LIST — — — — lists the available files from the Pi1541 (optional)
LOAD”FB64" — — — — loads the default file browser, press RETURN
RUN — starts the file browser
You can use the cursor keys to chose the .PRG file and run it with RETURN key.

FB64
Run d64 file
Commands:
For the impatient:
LOAD"*",8,1 --(load first file on disk) is all that's needed after mountingListing the drive directory is only really necessary if you're dealing with a disk (image) of your own making and are confirming contents.
LOAD”$”,8 — — — — lists the drive content
Navigate with button 2 and 3 on your pi1541. Press 1 to select/mount your image.
LOAD “*”,8 — — — — load mounted image (* will load first file on the drive)
RUN
Button navigation, button 1 is the far left, button 5 is the far right.
Pi1541 navigation, button 5 can be used to add disk images to a mount list so that you can change images on the fly when playing a multi-disk games.
Alternative method for loading .d64 files:
OPEN1,8,15:PRINT#1,"CD:ZORK.D64":CLOSE1
LOAD"*",8
RUN
In this example we’re trying to load zork.d64.
Using fastloader to load .d64 files:
I use Epyx Fast Load and Action Reply. Download the .PRG and put it to 1541 folder.
LOAD”$”,8 — — — — lists the drive content
LIST — — — — lists available documents (optional)
LOAD”EPYX.PRG",8 — — — — loads the software fastloader
RUN
Navigate with button 2 and 3 on your pi1541. Press 1 to select/mount your image.
LOAD “*”,8 — — — — load mounted image (* will load first file on the drive)
RUN
Loading game with Epyx
Loading multidisk files:
Multidisk software can be for easier access, added to the list with button 5.

Note the numbers before the file name, representing the file order on the list, files are added with button 5.
Navigate with button 2 and 3 on your pi1541. Press button 5 to add your image to the list.
LOAD “*”,8 — — — — load mounted image (* will load first file on the drive)
RUN
When asked to change the disks, use navigation to so switch the disk and press select or just change the file order.
OLED display
It is possible to also add OLED screen to the hat, that displays additional info. If you decide to do so, you also need to update the options.txt as described before.

1.) Shows the track number (metadata from the d64 image), 2.) Disk number displays which disk you have mounted (for multidisk images), 3.) the same as 2.), 4.) file name, 5.) power LED, 6.) Activity LED
Note: Capital letters in file names will be displayed in gibberish. (press shift and C= key to get lower/upper case letters) or uncomment (remove the //) in the options.txt file.
//LowercaseBrowseModeFilenames = 1Case:

Usually cases depend on the form factor of your Pi1541, since this is a popular open source project there are multiple variants and form factors available. Please make sure yours will fit in the case.
I went with Cem Tezcans design: https://cemtezcan.com/blog/n178/pi1541-case-design-hobby-project
another variant that I like: https://www.thingiverse.com/thing:3329176
Resources
Video guide on how to set up (not mine).
Official page:


Hi, I've just acquired a Pi1541 Hat, and I'm trying to get it to work. It will not boot up. Then I read that it needs a Pi 3B or 3B+, I'm trying to use it with a 3A+ (2022 model) is that my problem? Do I absolutely require a Pi 3B?
A point I'd like to make is that LOAD"$",8 is not for actually mounting the disk. Disk mounting happens when it's selected on the Pi1541 or from either file browser (C64 or external HDMI/keyboard). LOADing "$" is how we would LIST the disk contents on the C64; it does not do anything more. More, if you're working with .d64 files procured from a collection found online, most of the images are configured so that LOAD"*",8,1 (load first file on disk) is all that's needed after mounting.
Reviewing the directory is only really necessary if you're dealing with a disk (image) of your own making and are confirming contents.
That said, an external monitor and keyboard will make even that operation completely…
I found the reason why my Pi1541 wasn't working : I forgot to solder J5-J8.
Fortunately @hackup helped me solve this on github.
Cheers
I'm now trying to start over. You mention a "supplied zip file (Pi1541.zip) but the link goes to the github of Pi1541io and there isn't any zip file there
Hi, thanks for your very clear guide, which IMHO is a very nice complement to the official documentation.
One of the problems I'm having is that the OLED screen shuts down right after power up after displaying the logo. Then it stays black.